
Changing a tire is a valuable skill that every driver should have in their arsenal. The process involves a few key steps: finding a safe location to pull over, gathering the necessary tools like a jack and lug wrench, loosening the lug nuts, lifting the vehicle, removing the flat tire, and replacing it with the spare. Once the spare is securely in place, lower the car and tighten the lug nuts fully.
Picture this: you’re cruising along the Trans-Canada Highway, enjoying the breathtaking views of Alberta’s rolling hills, when suddenly you hear a loud thud . A quick glance at your rearview mirror confirms the worst—your tire has gone flat. Whether it’s caused by debris on the road or simply wear and tear, a flat tire is one of those inconveniences that can happen to anyone, anywhere, at any time.
Knowing how to change a tire isn’t just about fixing an immediate problem—it’s about staying safe and prepared for the unexpected. In many cases, roadside assistance might not arrive quickly enough, especially if you’re traveling through remote areas. That’s why mastering this essential skill can make all the difference. While changing a tire yourself is a great way to handle emergencies, there are times when professional help is worth considering.
For instance, drivers in Calgary have access to exceptional service options that take the stress out of tire repairs and replacements, allowing them to focus on what matters most—staying safe on the road.
Why Knowing How to Change a Tire Matters
A flat tire isn’t just an inconvenience—it can also escalate into a safety hazard if not addressed promptly. Imagine being stranded on a busy highway or a secluded road at night, with no idea how to fix the issue. In such scenarios, knowing how to change a tire becomes more than just a useful skill; it’s a critical tool for securing your safety and peace of mind.
Beyond safety, there are practical reasons why this knowledge is invaluable. For starters, waiting for roadside assistance can take hours, depending on your location and the time of day. During that delay, you could miss important appointments, waste fuel idling your car, or even risk further damage to your vehicle if it’s left improperly positioned.
Additionally, changing a tire yourself can save you money in the long run. While some services offer complimentary roadside assistance, others charge fees that can add up quickly. By handling the situation independently, you avoid unnecessary expenses and gain confidence as a driver.
Essential Tools and Preparations for Changing a Tire
Before you dive into the process of changing a tire, it’s crucial to have the right tools and preparations in place. Being equipped with the essentials not only makes the task easier but also secures your safety throughout the process. Here’s what you’ll need:
1. Basic Tools Every Driver Should Carry
Most vehicles come with a spare tire, a jack, and a lug wrench stored in the trunk. These are the bare minimum tools required to change a tire. However, it’s a good idea to double-check that these items are in working condition before hitting the road. Additionally, consider keeping a few extra items in your car for added convenience:
- A wheel wedge or heavy object (like a rock or brick) to prevent the car from rolling.
- A flashlight or headlamp for visibility if you’re stranded at night.
- Gloves to protect your hands from dirt and sharp edges.
- A rain poncho or tarp to keep yourself dry and clean while working on the ground.
2. Safety First: Preparing Your Vehicle
Changing a tire isn’t just about tools—it’s also about creating a safe environment. Follow these steps to prepare:
- Find a safe location : Pull over to a flat, stable surface away from traffic. Avoid soft or uneven ground that could cause the jack to slip.
- Engage the parking brake : This prevents the car from rolling while you work.
- Turn on your hazard lights : Alert other drivers that your vehicle is stationary.
- Secure the wheels : Place a wheel wedge or heavy object behind or in front of the tires to add an extra layer of stability.
3. Check Your Vehicle Manual
Every vehicle is slightly different, and your owner’s manual may provide specific instructions for changing a tire. For example, some cars require you to remove the hubcap before accessing the lug nuts, while others have unique jacking points. Taking a few minutes to review this information can save you time and frustration later.
Step-by-Step Guide to Safely Change a Tire
Changing a tire may seem intimidating at first, but by following these step-by-step instructions, you can complete the task safely and efficiently. Each step is designed to guide you through the process with clarity and precision.
Parking in a Safe Location
The first and most important step is securing your safety. Pull over to a flat, stable surface away from traffic. Avoid stopping on hills or soft ground, as this can make jacking up the car unsafe. Once you’ve found a suitable spot:
- Turn on your hazard lights to alert other drivers.
- Engage the parking brake to prevent the car from rolling.
- Place a wheel wedge or heavy object in front of or behind the tires to add stability.
Loosening the Lug Nuts
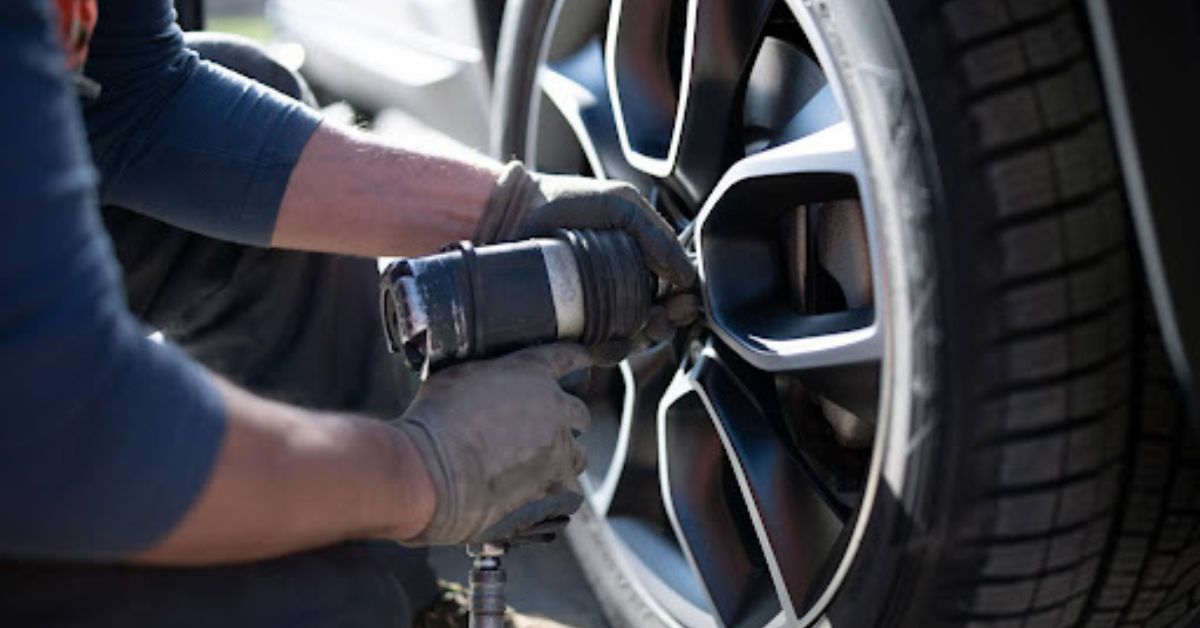
Before lifting the car, you’ll need to loosen the lug nuts holding the flat tire in place. Use the lug wrench to turn the nuts counterclockwise. Don’t remove them completely at this stage—just loosen them enough to make removal easier once the car is elevated. If the nuts are stuck, try tapping the wrench gently with a solid object to break the seal.
Using the Jack to Lift the Vehicle
Locate the designated jacking point near the flat tire—it’s usually indicated in your vehicle’s manual. Position the jack securely under this point and begin lifting the car. Raise the vehicle until the flat tire is slightly off the ground. Double-check that the car is stable before proceeding to the next step.
Removing the Flat Tire and Installing the Spare
With the car elevated, you can now fully remove the loosened lug nuts and take off the flat tire. Carefully lift the spare tire into place, aligning the holes with the wheel bolts. Hand-tighten the lug nuts onto the bolts to hold the spare tire in position.
Lowering the Car and Finalizing the Process
Once the spare tire is securely in place, lower the car slowly using the jack until the spare tire touches the ground. Then, use the lug wrench to tighten the lug nuts fully in a crisscross pattern. This secures even pressure and prevents the tire from wobbling. Finally, remove the jack and store all tools back in your vehicle.
Conclusion: Stay Prepared for Any Tire Emergency
Knowing how to change a tire is an invaluable skill that every driver should have in their toolkit. From finding a safe location to tightening the lug nuts securely, each step plays a critical role in securing your safety and getting you back on the road as quickly as possible. While this guide equips you with the knowledge to handle a flat tire independently, it’s also important to recognize when professional assistance might be the better option.